Reviews of Samsung FE series phones have always been interesting and popular, as they have a good balance between flagship features and affordable price. The Samsung Galaxy S25 FE, which was released on September 4, 2025, is no exception and has a lot of fans. Now in this article, we are going to dissect this phone and see what Samsung has done under its frame. So let’s go and examine the internal structure of the S25 FE in detail.
First of all, we will remove the SIM card tray. If you look closely, you will see a gray rubber gasket around its hole.
Now we need to heat the back of the phone with a hair dryer or heat gun to loosen the glue under it. Then we can remove the back with a plastic tool. I personally prefer the hair dryer because the high heat is less likely to damage the internal components.
Here you can see the back glass better. The camera lens covers can also be replaced by heating them and gently prying them off. So you don’t have to open the entire phone to do this.
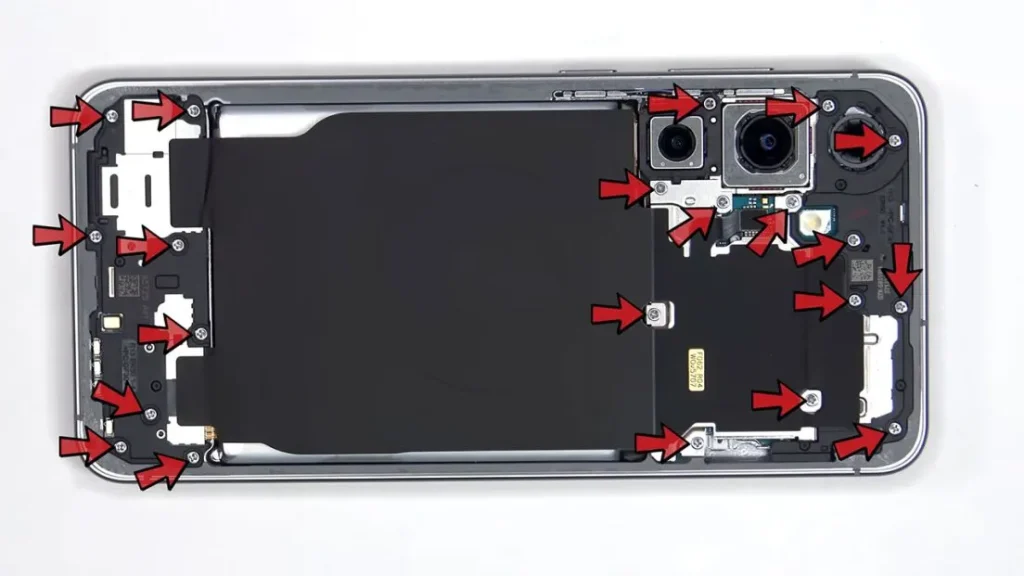
Now we need to remove 21 Phillips screws.
Here’s the wireless charging coil and NFC antenna, plus a graphite film for heat transfer.
Next, we’ll disconnect the battery cable and the rest of the cables. After removing the bottom speaker, we’ll see that a flat cable connects the main board to the display, and these two connect the main board to the subboard.
If you want to replace the display, you have two options:
Option 1: Open the back cover, remove the bottom speaker screws and the speaker itself. This will give you access to the display cable. Then you disconnect the cable, heat the front of the phone where the display is to loosen the adhesive, remove the old display, apply new adhesive, and attach the new display. Just make sure to reconnect the flat cable to the back of the display and close the phone.
Second way: Just start from the front. Heat the front of the display to loosen the adhesive and remove the display. Then you remove the flat cable from the back, apply new adhesive and attach the new display and reconnect the cable. But this method is more difficult because the flat cable is not very long and it is very difficult to connect it to the back of the display without opening the back of the phone.
This is the bottom speaker. The vibration motor or haptic feedback is located in the speaker assembly itself and behind the speaker.

To remove the battery, there is a pull tab. You pull these tabs from the places indicated by the arrow to release the battery and you can take it out. This battery is 4900 mAh.
This is the top of the call speaker. The speaker itself and an antenna board are also in the corner.
If we look at the main board, we see a 12-megapixel ultra-wide lens, a 50-megapixel main lens, and an 8-megapixel telephoto lens. Only the main and telephoto cameras have optical image stabilization (OIS). There is a second microphone in the upper corner and an LED flash below it.
If we look at the other side of the board, we see the camera connectors that detach with a little pressure. There is also a proximity and ambient light sensor, and a graphite pad behind the shield for heat transfer. When we remove the film or graphite pad, we see a thermal pad on the RAM that is placed on the processor. Here you can see the thermal pad that we removed better.
The 12-megapixel front camera is held in place with an adhesive gasket. If you want to replace it, you will need to carefully remove the gasket around the camera with a cutter or razor blade and remove it. We also see a vapor chamber under the battery and motherboard that helps with heat transfer.
Two Phillips screws hold the subboard in place.
If we look at the subboard, we see the charging port with a red gasket around it and the main microphone next to it. The SIM card tray is also on that side.
When we remove the subboard, we see a red gasket behind the SIM card tray. The fingerprint scanner is also here, which you just pull out to replace. Here’s a better look at it.
The volume and power button ribbon cable is also here. To replace it, you just need to remove it from the frame and remove this metal piece that is in the groove of the frame. The buttons themselves can also be removed from the frame. There is also a moisture indicator sticker, which is a white sticker and is located on the frame, under the SIM card tray. In this phone, if you accidentally insert the SIM eject tool into the wrong hole, you don’t have to worry because both the filters and the microphones are above the holes and won’t be damaged.
Conclusion
The repairability score of this phone is 9 out of 10 in my opinion. Overall, the Samsung Galaxy S25 FE is a well-built phone with high repairability. Replacing the battery doesn’t require much effort, and the rest of the phone also makes the phone easy to repair, given the relatively easy access to the components of Samsung phones. Now it’s time to put the phone back together. Once everything is back in place, we apply the new adhesive and put the back door back in place. We turn the phone over, turn it on, and that’s it!


